How to create Contact Form for Blogger (2020)
 |
How to create Contact Form for Blogger (2020)
|
|
Guys in Todays Post we will tell you how you can add blogger contact form in your blog. Adding a contact us form in a blogger is very tough because blogger
does not support contact form plugins like WordPress.
If you wanna add a Contact Page on your Blog then you have to do this with manual methods. Most of the bloggers are simply using thrid-party websites like (Jotform, 123contactform), etc.
But we will tell you two methods first would be on how to add official contact form in blogger and second would be with the help of a third party website.
The Benefits of Official Blogger Contact Form
It has a simple interface that makes visitors easier to contact with you.
You will get the message very fast. Here someone just sent a message and there you got the message, And message deliverability is 100% sure.
If you know CSS(cascading style sheets) then you can make changes and customize the form how you like it.
The biggest benefit of using the official form is the page your blog's entire page will not get reloaded to send the message.
Now let's have a look at how we can add our official contact form in blogger.
Also Checkout this exclusive guide: What is a Blog?
Adding Blogger Official Contact Form
1. Adding the Contact Widget Gadget
Follow our steps given below to add contact form gadget in blogger.
Step 1: First of all visit blogger.com and login to your account if you have more than one accounts then choose that account in which account you want to add a contact page.
Step 2: Click on the Layout tab in the left sidebar.
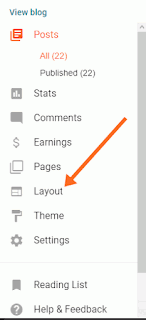 |
Click on Layout Tab in the left sidebar
|
|
Step 3: Now you will be able to see Add Gadget option in the right sidebar. Click on it and you will get a list of widgets to add.
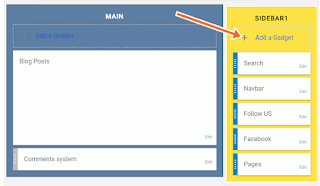 |
Now Click on Add a Gadget in the right Sidebar
|
|
Step 4: Then Guys Scroll Down to the End and there you will see a Contact Form Widget, Click on it and Add it to your Blog.
 |
Scroll down to the End and Click on (+) Add Contact Form in Blogger
|
|
That's all Guys You have successfully Added the Contact form Widget in Blogger/Blogspot.
2. Hiding the Gadget from your Blog
Now Guys we will learn how we can hide this contact form gadget.
Step 1: Now We need to manually Hide this Contact form, So click on Theme options in the left sidebar.
 |
Click on Theme option in the Left sidebar
|
|
Step 2: After that Guys Click on Edit HTML Then you will get your whole website code.
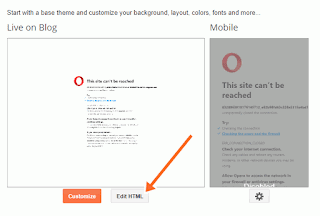 |
Now Click on Edit HTML option
Step 3: Now Guys search for ]]></b:skin> in the HTML code and place the code given below just before this tag. And to Enable Search Option Press (Control + F) or (Command + F) Paste the Code here and Press Enter to Search for this Code.
|
|
Step4: After That Guys Paste the Code given below Just Before the Code ]]></b:skin> and Click on Save Changes and Boom You have Successfully Hide the contact form.
 |
Paste the Code Given Below Like This
|
|
div#ContactForm1 {
display: none !important;
}
3. Adding Contact Form in Blogger Page
Step 1: Guys Go to Pages and click on New Page.
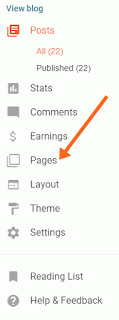 |
Click on Pages Option in the Left sidebar
|
|
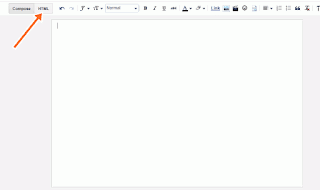
Step 2: Now go to the HTML tab option Click on Create a New Page and then click on that page go to HTML tab Remove anything from it and Copy Paste code there the code given below.
 |
Click on Pages Option in the Left sidebar
|
|
<div dir="ltr" style="text-align: left;" trbidi="on">
<div class="widget ContactForm" id="custom_ContactUsFromForBlogSpotBlogger">
<div class="contact-form-widget">
Get in touch with us by filling out the form below.<br />
<div class="form">
<form name="contact-form">
Your Name
<br />
<input class="contact-form-name" id="ContactForm1_contact-form-name" name="name" size="30" type="text" value="" />
Your Email
<span style="font-weight: bolder;">*</span>
<br />
<input class="contact-form-email" id="ContactForm1_contact-form-email" name="email" size="30" type="text" value="" />
Your Message
<span style="font-weight: bolder;">*</span>
<br />
<textarea class="contact-form-email-message" cols="25" id="ContactForm1_contact-form-email-message" name="email-message" rows="5"></textarea>
<input class="contact-form-button contact-form-button-submit" id="ContactForm1_contact-form-submit" type="button" value="Send" />
<br />
<div style="max-width: 222px; text-align: center; width: 100%;">
<div class="contact-form-error-message" id="ContactForm1_contact-form-error-message">
</div>
<div class="contact-form-success-message" id="ContactForm1_contact-form-success-message">
</div>
</div>
</form>
</div>
</div>
<div class="clear">
</div>
<span class="widget-item-control">
<span class="item-control blog-admin">
<a class="quickedit" contactform1="" href="https://www.blogger.com/rearrange?blogID=8799058979810298021&widgetType=ContactForm&widgetId=ContactForm1&action=editWidget&sectionId=sidebar-right-1" onclick="return _WidgetManager._PopupConfig(document.getElementById(" target="configContactForm1" title="Edit">
<img alt="" height="18" src="//img1.blogblog.com/img/icon18_wrench_allbkg.png" width="18" />
</a>
</span>
</span>
<br />
<div class="clear">
</div>
</div>
</div>
| Step 3: Now Guys You need to add a Title like 'Contact US' and save this page. Boom Your Contact us Page for Blogger has been successfully created and now ready to use free of cost. |
The Messages will be Delivered to the Blog owner's Email and If Blog has more than one owner's Then messages will be delivered to all blog owners.
Method 2. Embedding a Jotform
Guys Jotform is an online form creator tool for beginners. It is free to use.
Step 1: Creating and Embedding a JotForm
1. Signup on Jotforms. You can signup with Email or you can sign in with your Google account.
 |
Signup on Jotform with Email or your google account
|
|
2. Now Guys Click on Create Form Button.
3. Now Click on Classic Form. Then Choose your choice from there.
4: Guys Next Click on Use a Template.
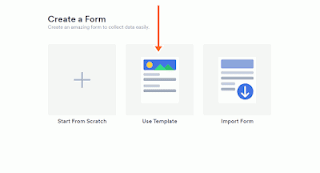 |
Click on use Template Option
|
|
5. Now Choose the Template what you like and what best fit's your needs. There are lots of options available in contact forms. You can also change fields, texts, styles, colors, etc later. I would recommend you to use Fancy Envelop Contact Form.
 |
Here Choose Fancy Envelop Contact Form
|
|
6. When you selected your template and click on Continue, You will be able to edit a preview of your contact form.
7. To edit and customize form you need to click on the blue paint icon. After that customize it how you want, like colors, font, fields, etc.
 |
This is the Blue Brush for Customizing your Contact Form
|
|
You can also add new elements in your contact form if you want or you can remove elements like website.
If you wanna remove element then click on that element and there you will get a delete option simply click on that and delete the element.
If you wanna add new elements to your then simply click add form element option in top on the left sidebar.
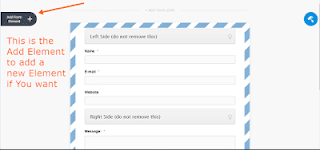 |
This is the Add Element Option Which will help you to add a new form element
|
|
8. When your customization is done Now it's time to publish that form. Click on Publish Tab.
9. Now Guys in Publish Tab go to Platforms option in the left sidebar.
 |
Now Click on Platforms in the Left sidebar
|
|
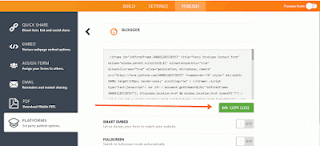
10. Now Click on the Blogger option in the Platforms tab and click on the copy code option there.
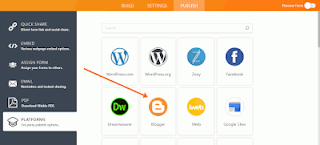 |
In the Platforms Tab Click on Blogger Option
|
|
11. Now Guys Go back to your blogger account and Click on Pages in the left sidebar.
12. Now Guys Click on New Page to add a new Page on your Blog.
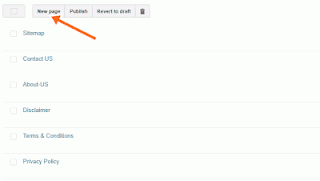 |
Now Click on New Page to Create a New Page for your Contact Form
|
|
13. Now Guys Click on HTML Tab and Paste That code which you have copied from Jotform there.
 |
| Click on HTML option and paste that code here |
Now Guys Set your page Title Contact US and click on save changes.
Boom You have successfully Embedded a Jotform into your Blog Successfully and you are now Tention free from your contact us page.
Conclusion
Guys I hope You have Learned How you can Add Contact Page on your Blogger/Blogspot Blog. I would Personally Recommend you to use Blogger Widget Form instead of Jotform.
Because Jotform will reload all your page content to send a mail. But Blogger Widget form is simple and easy to use without reloading page.
If you want content about any topic then you can comment below and tell us what you want we will try to provide you as soon as possible.
Good Bye for Now Guys.




0 comments: